Want to create a polished, professional video that impresses your audience? It’s easier than you might think. Ultimate Guide & Expert Tips to Create Pro Quality Footage 2023.
Achieving a professional look is more about your technique than your tools, so you don’t need to drop a fortune on expensive equipment – chances are good that you can make great videos with whatever you’ve got right now, just by paying attention to a few key details.
10 Beginner Video Tips for Making Professional Videos
If you’re looking to create professional-looking videos for any purpose, this awesome list of tips and best practices will help you improve the quality and engagement of your videos.
Let’s get started.
1. Plan Ahead for Your Video
Creating a video isn’t just about hitting the record button. There are multiple factors that come into play to make a video stand out among others. And believe it or not, they mostly have to do with how well you plan your video before actually creating it.
This first tip can be broken down into several parts. Let’s take a look at some of these tips and best practices for planning a successful video.
Set a goal.
Before you start making your video, you need to know why you’re making one in the first place. Understanding the goal of your video will help you plan, shoot, edit and promote your video in a more organized manner, saving you tons of time and resources.
Most importantly, it will make your video more effective in terms of achieving the desired results. Below are some examples of questions to ask when setting a goal for your video:
- What are you looking to achieve with your video?
- Are you trying to make people laugh?
- Are you trying to get them to visit your website?
- Are you promoting your product?
- Teaching them something new?
You can use a SMART goals template like the one below to jot down your video goals.

Customize this template and make it your own!
Identify your target audience.
You can’t possibly target everyone in the world, because then who are you really talking to? Not having a clear vision of your ideal viewer groups will simply dilute your message and video content.
Your audience will determine the way you write your script, the way you shoot your video and the way you edit it. It will also determine where you distribute your videos depending on where your main audience hangs out online.
Think of who you want to be seeing this, and then think of where on the internet they usually “hang out” so you can know to distribute it later.
Here’s a customer persona template to use as part of your video planning process:
Research your topic.
Next, it’s time to find the right topic or theme for your video — it’s crucial to find a topic that not only appeals to your target audience but also helps you achieve your goals.
A big part of choosing your topic is also focusing on a keyword. This is particularly important if you want to rank on Google and other search engine result pages.
If you’re creating videos for YouTube, one of the easiest ways to decide your video topic is to conduct keyword research inside YouTube. Just search for your keyword on YouTube, and carefully look at the top results and search predictions to see what works and what doesn’t.
For example, here are the search predictions that show up on YouTube when you type in “Bitcoin”:

At this stage, you can narrow down your YourTube video idea or topic based on the type of Bitcoin video you’re about to make: daily news, mining setup, predictions, etc.
You can also use tools like Ahrefs, TubeBuddy, and vidIQ to find the right keywords to target. Keep your video’s overall theme, topic or problem in the center and look for relevant keywords around them to find the best fit
Also, find a topic that fills “content gaps” and provides substantial value to the audience.
Choose the right video type.
Now that you know the topic of your video, it’s time to finalize the type of video you’re going to create. This will directly impact the tone and style of your video. And, of course, it will affect the entire process of shooting, animating or editing it.
Here are some video types you can choose from:
- Animated
- Live-action
- Screen recording
- Whiteboard
- Motion graphics
- Typography
- Combination
It’s important to note that some video types are more suited for formal and professional videos, while others are better suited for casual videos. So, pick a video type that’s suited to your content style.
Here’s a list of video types for YouTube to give you some inspiration.

Make video production easier than ever with Visme.
- Choose from our fully customizable templates
- Customize fonts and colors to match your brand
- Access animated design elements that tell your story
Write a script.
Once you have finalized the topic and type of video you’re going to make, it’s now time to work on its content. This is best done by writing a video script that lays out your story.
You can either write a word-by-word script for the video or just the general topics you aim to cover in the video.
Either way, the point is to have a reference document so you don’t accidentally forget to cover an essential topic when you begin filming the video.
A storyboard is simply a visual representation of a story, which is made up of a sequence of images and graphic illustrations that helps creators visualize their videos and creative projects.
Don’t forget to keep your script or storyboard handy on the day of the shoot.
Pick the right location.
Another essential step of the video planning phase is picking the location of the shoot.
Picking a location is more important than you think — it gives context to the video and can considerably enhance the look and feel of your video.
You can shoot the video in-house or head outdoors. Regardless of the option you go with, the look and feel of your video will be completely different.
Hey marketers! Need to create scroll-stopping visual content fast?
- Transform your visual content with Visme’s easy-to-use content creation platform
- Produce beautiful, effective marketing content quickly even without an extensive design skillset
- Inspire your sales team to create their own content with branded templates for easy customization
 2. Use a High-Quality Camera
Another essential tip to improve your video quality is to use the right camera. Contrary to popular belief, you don’t need an expensive or professional camera to make good quality videos.
There are two main camera options to choose from: your built-in mobile phone camera or a professional camera. Let’s take a look at each option in more detail:
Mobile camera.
The camera quality of almost all top mobile phone brands has seen considerable improvement in the past few years.
So, there’s a high chance that the mobile phone you currently have in your pocket is capable of producing 4K videos at 60 FPS — enough to match the quality of any competitor you may have.
Here’s a video that’s entirely shot on an iPhone 13 Pro:
The video quality is easily on par with some of the more expensive professional cameras out there.
Professional camera.
Sometimes, to create professional-looking videos, a phone camera might not be enough. In that case, you’ll most probably have to invest in a professional camera. This will give you much more control over the quality of video you’re producing.
Plus, you’ll get features that a phone might not be able to offer, such as built-in image stabilization and the ability to swap lenses. Also, the superior color science of a professional camera will considerably boost the production quality of your videos.
So, if you’re looking to invest in your camera gear, we suggest you pick a camera that’s packed with features you’ll need for your type of video.
For example, if you’re going to make in-house videos, purchasing a DSLR may be a good option. But if you’re going to create vlogs, then a mirrorless camera may be more suited to you, as carrying a bulky DSLR may be too much for your arms.
3. Make sure you have enough lighting
Lighting is another essential part of any professional video. If your video is too dark or too bright, it obviously won’t look good, and you’ll run the risk of people skipping your content.
There are two primary light sources available to any video creator:
Natural lighting.
For beginners, natural light is an excellent option. It doesn’t cost anything and is fully capable of making the subject of your video look good.
To use natural lighting to your advantage, remember to shoot outdoors on a cloudy day or during the golden hour. At these times, natural light is super soft and cinematic — it won’t make your subject squint and no harsh light will be hitting their face.
Studio lighting.
As you scale your production capacity, you’ll probably want to invest in lighting equipment to boost the quality of your videos.
Here are some lighting equipment you may want to add to your production gear:
- Key light
- Rim light
- Triggers and flashes
- Softbox or shapers
- Reflectors
Check out this excellent video by Ben Johnson, who’ll walk you through all the steps you need to take to give your videos a nice, cinematic look:
4. Upgrade the Audio Quality
The audio of your video can make or break your content, and there are a few simple things that you can do to save the integrity of your video’s audio quality.
The best way to capture audio from your subject is to use any microphone other than your camera’s built-in mic. Because no matter how good your camera’s built-in mic is, it’s still not enough to replace a dedicated external audio recorder.
There are generally three types of microphones you can use:
- Condenser microphones
- Dynamic microphones
- Lavalier microphones (or, lapel mics)
Each is ideal for different uses, so invest in one that gets your work done.
Check out this video by Think Media if you’re looking for budget mic options for your videos:
Before filming, always test the sound to ensure you’ve got all of the above set up correctly. For someone with no prior audio experience, that’s usually the only way to make sure you’re getting it right.
5. Use a Powerful Video Editing Software
Using video editing software is an essential part of the production process.
This will enable you to add transitions to your videos, color grade them, add titles, subtitles, intros and outros, and stitch them in a way that’s easy to understand for the audience.
There are several video editing software to choose from, both free and paid. Here’s a list of some of the most popular ones:
- Visme Video Maker
- Adobe Premiere Pro
- Apple Final Cut Pro
- DaVinci Resolve
- Adobe Premiere Elements
- Corel VideoStudio Ultimate
- CyberLink PowerDirector
Pro Tip: Adobe Premiere Pro and Final Cut Pro have several free and paid plugins to choose from, which will cut your editing time in half.
6. Avoid Using Shaky Footage
Stabilized footage is essential for the success of any top video. Because shaky footage not only looks unprofessional, it also strains the eyes of your audience.
We suggest you either get a hold of a camera with built-in image stabilization or purchase a tripod to fix this. Tripods usually work when the subject is still, but that may not be the case for all video types.
For example, if you’re creating vlogs, you may need to walk around the city, and a tripod might not do you much good. In that scenario, consider investing in an external stabilizer.
Many video editing software also has a built-in feature to stabilize shaky footage, but the results may not be perfect each time.
Make video production easier than ever with Visme.
- Choose from our fully customizable templates
- Customize fonts and colors to match your brand
- Access animated design elements that tell your story
7. Improve Your Video Composition
Composition is how you choose to frame your subject in the video you’re about to capture.
The most popular way to frame your subject is to follow the Rule of Thirds, which divides the frame into a 3×3 grid, creating intersections that are ideal areas to place your subject.

And the best way to frame your subject is to place them at one of the intersections in your viewfinder, and their eyes should line up along the top line in the frame.
You can also place your subject in the middle of the frame, but the downside of that is you’ll end up with a lot of space in the top third of the frame.
Another important thing to keep in mind while shooting is to mind the head of your subject. Don’t have too much space above the subject’s head, but don’t cut off the top of their head either.
If you must cut something off in big dramatic face closeups, let it be the top of the subject’s head, not their chins.
Here’s are 4 framing and composition techniques you can use for your videos:
8. Be Comfortable on Camera
If you have a human subject present in your video, such as in a vlog or video podcast, their camera presence can significantly impact the quality and effectiveness of your video.
If the subject looks comfortable, has a friendly smile on their face and is wearing nice clothes, then the audience will like to see what they have to say or do.
While camera presence may come naturally to some people, others have to practice how to control emotions so they don’t look uncomfortable or nervous in front of the camera.
To improve your camera presence, we suggest you sit/stand up straight with your shoulders back so you look professional, focused and relaxed.
You should also try to speak slowly and enunciate each word clearly so your message is easy to understand.
As you continue to create more and more videos, you’ll get used to being in front of the camera, and your camera presence will improve in time. So, don’t be shy and keep practicing.
Here is Cathrin Manning talking a few tips on how to become confident in front of a camera:
9. Film in Small Segments
Filming videos in small segments is a great way to keep yourself focused on the topic you’re discussing. And it also becomes easier to edit the footage in post-production.
Let’s say that you’re making a video discussing the 12 ways to become a better leader. You can hit the record button, talk about one point, then hit the stop button and repeat the process for each point.
This way, your thoughts won’t get jumbled up, and all you need to do is stitch up smaller videos to create your final product.
10 Promote Your Videos
Regardless of the type of video you create, whether educational, business-related or simply an artistic video, make sure you properly share it with your audience to maximize its impact.
Here are some of the ways you can promote your video content:
Social media.
Depending on your goals and audience, you can distribute your videos on different platforms.
For example, if video marketing is what you’re after, you can push your videos on Facebook, Twitter, Instagram or YouTube as regular posts or targeted ads.
Here’s how we (at Visme) share our YouTube videos on LinkedIn:
Groups and forums.
You can also share your videos on different groups and forums, such as Reddit, Quora and Facebook groups.
To make this work, start by looking for groups and forums that discuss the problem you have a solution for. Then, find people with genuine problems and respond to their issues.
Once you have built a relationship in the group, you can then share your video content related to that topic, and other members will be more than happy to click on your content.
But if you start spamming groups with your videos with no context, then nobody will take your content seriously, and you may even get reported or kicked out.
Email marketing.
Many businesses maintain email lists to share weekly content with their audience.
If this applies to you, we suggest sharing your videos with email contacts since they’re already your subscribers and want to hear from you. Plus, this is a great way to notify the audience you’ve produced fresh new content.
Alternatively, you can also include your latest YouTube videos in your weekly or monthly newsletters. Or, gather up relevant videos to share on a specific email newsletter topic.
15 Tips for Filming and Editing Marketing Videos
In today’s section, I’m going to share 15 tips for editing and producing marketing videos, so grab a cup of coffee and get ready for a crash course in marketing video production.
Marketing Videos: Pre-Production
Note that these tips apply to both traditional videos and live videos, such as those made with YouTube live, Facebook Live, or Instagram Live.
1. Create a Storyboard and/or Shooting Script
The best marketing videos don’t just happen – they’re a result of meticulous planning and preparation.
Before you even think about getting your camera equipment ready, consider putting a storyboard and shooting script together. Storyboarding helps you figure out exactly what shots you need before you start filming, and a shooting script is like a screenplay for your video.
You don’t have to draw a stunning masterpiece for your storyboard. In fact, you don’t need to draw it at all. You can use a series of still photographs as a storyboard, or even rough sketches or stick figures – whatever is easiest. Just make sure you know what shots you need before you start filming.
Remember – the more time you spend planning your marketing video, the less likely you are to find yourself missing footage later on.
2. Prep Your Presenters or Interview Subjects
Make sure all your presenters or subjects know what’s expected of them beforehand to minimize mistakes or wasted time on the day of the shoot. You should have a good idea of what the finished product is going to look like long before you arrive at your location, and your presenters should know exactly what they’re doing.
Also, try to avoid having your presenters memorize pages upon pages of script – they’re probably not actors, and asking this of them is likely to cause more anxiety (and mistakes) than allowing them a little freedom.
3. Know What B-Roll Footage You Need
Planning to intersperse shots of your team hard at work into your video, or cut away from your presenter to other footage? Then you need what videography professionals call B-roll footage.
B-roll is essentially any footage that isn’t of your primary subject. If you’re filming an explainer video showcasing your software product, B-roll footage might include shots of satisfied customers using your product, or an external shot of your offices, for example.
Whatever footage you need, figure it out during the pre-production phase to avoid situations in which you need footage you don’t have. Remember – there’s no such thing as too much B-roll.
TIP: If you need a shot of something that would be difficult or impossible to film yourself, such as aerial shots or footage from exotic locales, you can always use stock B-roll footage. I’ve used footage from Beachfront B-Roll several times in the past, and the quality and diversity of the footage is excellent.
Marketing Videos: Production
Whether you’re shooting a video or taking a photograph, composition is crucial to the finished product. Composition is so important it deserves a post in and of itself. However, since this is a crash course, we’ll just cover the basics for now.
Composition is the proper term for how a shot is framed and staged, or “composed.” This refers to how your subject – whatever it is you’re filming – is arranged and positioned within the shot.
4. Use the Rule of Thirds
Whenever you’re filming anything (or taking photos), remember the “Rule of Thirds.”
Imagine your shot is divided into nine equal sectors by two horizontal lines and two vertical lines, like so:
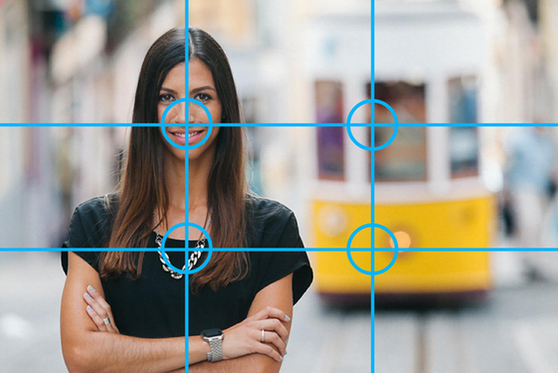
Notice how the primary subject in the image is positioned where two of the four points (which are known as the “anchor points”) intersect? This technique is used to draw the eye toward the main points of interest in the shot. The viewer’s eye will naturally gravitate towards the top-left anchor point, and many people will spend longer dwelling on this area than other parts of the shot, making it a logical point at which to position the main area of interest in your shot – in this example, the face of the subject.
This is a pretty standard composition using the Rule of Thirds, and although it might not seem that remarkable, composing your shot in this way makes it easier for the eye to “read” and results in a much more aesthetically pleasing shot overall. Your audience probably won’t even notice the composition of the shot, because it just “works.”
The Rule of Thirds can be applied to just about any type of shot, including landscapes. Using the horizontal lines is a great guide for where the horizon line of your exterior shots should be, and where your subject should be positioned:

In the example above, the upper of the two horizontal lines is the logical horizon point for this shot, as using the lower of the two would result in the shot containing way too much empty sky. Of course, this might be precisely the effect you’re trying to achieve, so think of this as a guideline rather than a hard-and-fast “rule.”
Many cameras enable you to overlay this grid onto your viewfinder, making it easy to compose your shot before and during filming.
However you choose to frame your shot, make sure that you keep composition in mind, especially when setting up your camera. To read more about shot composition, check out this great guide to line, shape, negative space, and other composition techniques.
Marketing Videos: Lighting
Few things will ruin a marketing video faster than a shot that is either too light or too dark. Yes, you can correct image brightness and contrast in post-production to some extent (more on this later), but it’s better to get the shot right on the day of the shoot than relying on “fixing it in post” later on.
5. Avoid Conflicts Between Natural and Artificial Light
When it comes to lighting in video, different kinds of light have different temperatures. These color temperatures are measured in degrees Kelvin (°K):

Again, this is a complex topic and could easily warrant its own post, but for our purposes, all you need to know is that mixing two light sources with different color temperatures will make for an unevenly lit shot.
Let’s say you’re shooting an explainer video featuring a member of your team. You’ve chosen an indoor room with good acoustics (more on this later), and you’re ready to start filming. The room is lit primarily by fluorescent lights, but there’s a problem – a large window that lets in plenty of natural daylight.
If you position your subject too close to the window, you could run into a potential contrast in light sources – the fluorescent overhead light with a temperature of around 4500° K, and the daylight, which has a temperature of around 5600° K. This kind of conflict can be difficult to compensate for, and it’s a headache you really don’t need.
Wherever you’re shooting, ensure that your primary light source is even and consistent. If you shoot indoors, avoid rooms with windows. If this isn’t possible, position your subject sufficiently far from the windows to avoid the daylight interfering with your shot.
6. Manually Set Your Camera’s White Balance
Now we know that different light sources have different temperatures, we need to account for these temperature ranges by manually setting the camera’s white balance – a process that basically tells the camera what “true white” looks like in an environment to avoid color casting.

In the image above, the shot on the left has a blue color cast caused by the natural temperature of the daylight in the shot. The white balance of the shot on the right has been set correctly, capturing the true colors of the image.
Many cameras have an auto-white balance feature, but I strongly recommend learning how to set it manually. This avoids relying on your camera to achieve a correctly color balanced shot. You can learn how to do this by referring to the instruction manual of your camera.
Even if the color casting in the example above is the effect you’re trying to achieve, film the shot using the correct white balance and adjust the color in post-production – don’t rely on lazy camerawork to achieve a particular effect.
7. Avoid ‘Spotlighting’ Your Subject
Unless you’re filming a Broadway musical, you should probably avoid placing your subject in bright pools of direct light. Intense primary light sources can blow out the brightness and contrast of your shot and cause unflattering reflections on your subject. There are many different lighting techniques, each of which can be used to achieve a certain effect.

If you’re lucky enough to have a professional light rig, don’t just point it at your subject – make sure your shot is lit evenly, and use a reflector and/or a diffuser to minimize harsh spotlighting or shadows (such as the “mustache” in the far-left example above).
8. Check the Acoustics of Your Filming Location
Before you start filming, check the acoustics of the location in which you’re shooting. Is there an echo? If so, try and find somewhere else to shoot. You can fix a lot of audio problems in post-production, but even a faint echo can be a nightmare to get rid of completely.
You don’t need to soundproof a conference room in your office (but hey, if you can, go for it), but be sure to bear the acoustics of your location in mind when you’re scouting for possible places to film. It could save you a lot of headaches later.
9. Shoot Multiple Takes
Even experienced presenters make mistakes, and the last thing you want is a situation in which you only have a single take of a crucial part of your marketing video.

Even Norse gods mess up sometimes.
On the day of the shoot, make sure to run through multiple takes. This provides you with a safety net in case you notice something wrong with one of the takes, and allows you to edit together your final sequence from several clips of the same sequence rather than relying on just one.
Marketing Videos: Post-Production
Before we dive into my post-production tips, you need to choose and familiarize yourself with your editing software.
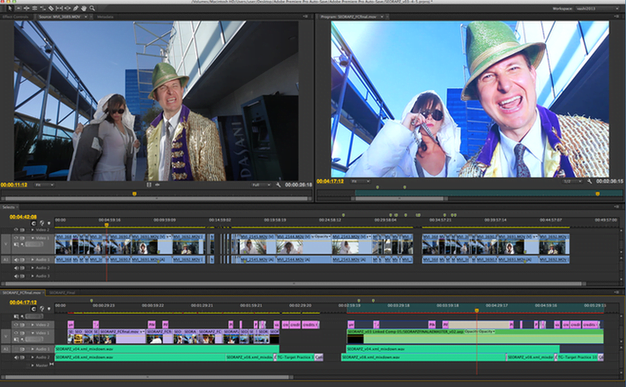
I strongly recommend using Adobe Premiere Pro, which has been my go-to editing package for almost a decade. This remarkably robust editing program has everything you need to start producing professional-quality marketing videos, and the pricing plans are very reasonable (around $250 per year for an individual license), meaning that the barriers to entry have been lowered considerably, even for small businesses.
Despite being a comprehensive professional editing suite, Adobe Premiere Pro is also surprisingly user-friendly, and the learning resources and user community at the Adobe website are amazing.
If you’re working on a Mac, you might be tempted to opt for Apple’s Final Cut Pro. Although Final Cut Pro is a fine editing package, I still recommend using Premiere Pro. In my opinion, the ease with which you can seamlessly move between Premiere Pro and other Adobe programs such as After Effects and Photoshop alone makes it the stronger software program.
10. Tidy Up Your Clips Before You Start Assembling the Rough Cut
When importing your footage into your editing program, clean up your clips as you import them. Most editing packages allow you to set “in” and “out” points for each clip, reducing their length by trimming out pauses, giggles, and false starts.
Editing the final sequence together using trimmed clips is a lot easier than adjusting each individual clip on the fly.
11. Always Cut ‘On the Action’
When editing a shot of someone doing something, make sure to cut to the next shot during the action that your subject is performing.
For example, if you’re editing together a sequence of someone opening a door before walking through it, cut to the shot of the subject opening the door at the precise moment the person turns the door handle. Cutting away before or after the action can look jarring and distract the viewer. You may not even have to worry about this, but it’s worth bearing in mind if you’re working on a more ambitious video.
12. Assemble the Rough Cut Before Working Out Any Timing Issues
Once you’ve got all the clips you need imported into your editing program, it’s time to start actually putting the rough cut of your marketing video together.
Editing a sequence can get complicated quickly, so tidy up your clips as you work.
However, before you begin the painstaking process of frame-by-frame editing, get your clips roughly into place. There’s no point agonizing over precise timing issues until your video has already begun to take shape. It won’t look pretty, but it’ll give you a solid idea of which parts of your marketing video need the most work.
13. Don’t Overdo It with Transitions and Effects
Unless you’re making a Star Wars parody video (which would be kind of awesome in a marketing context), don’t use radial wipe transitions – or star wipes, or any of the other “zany” effect presets that come with your editing software. The more attention to draw to your transitions and editing, the cheaper and more amateurish your video will look (and yet we still forgive George Lucas for this).
If you have to, use simple cross-fades to transition from one shot to another. Let your content do the talking, not your editing software.
14. Choose Your Music Carefully
Not every video needs background music, but if you’ve decided that yours does, be careful about your choices. For example, you probably wouldn’t expect to hear Norwegian death metal in a promotional video for an animal shelter. Ensure your music is suitable for your project.

Also, pay close attention to the licensing requirements of the music you plan to use. Unless you use royalty-free music or compose your own, most music is subject to stringent copyright restrictions that could land you in some seriously hot legal water if you don’t play by the rules. For help with this, use our guide on how to use music in ads (without getting sued!).
Remember – a record company won’t care if you’re “only” using copyrighted songs in a short marketing video. It’s copyright infringement, plain and simple, and it could result in a costly lawsuit, so tread carefully and err on the side of caution.
TIP: There are several sites that offer royalty-free background music and sound effects, including:
You can also use certain songs and orchestral pieces if they are considered to be within the public domain. You can read more about public domain music at the Public Domain Information Project, and browse a selection of public domain artists and genres at Public Domain Music.
15. Don’t Assume You Can Fix Everything in Post-Production
Editing packages such as Premiere Pro and Final Cut Pro are extraordinarily powerful and enable you to accomplish a great deal with your videos, but they’re not magic.
Don’t assume that any and all problems with your video can be fixed in post-production. Sometimes, you simply won’t be able to correct the brightness or contrast of a shot as much as you need to, or manage to isolate a single person’s voice in a room crowded with hundreds of people. Yes, it might be possible given enough time and skill, but post-production should be seen as a process to add polish and finesse to your video, not an opportunity to go back and fix mistakes that could have been easily avoided during a properly planned shoot.
Get over your hesitation
The first hurdle to great video is just getting started.
Sarah says people often don’t know where to start. Some don’t want to be on camera. Others think they need high-quality and expensive gear. “They don’t know you can create studio-quality video from the comfort of your iPhone,” she says.
Given the billions watching videos monthly on TikTok (1 billion), Instagram Reels (2.35 billion), and YouTube (2.68 billion), that should be a good enough reason for marketers to get started, Sarah says.
Need an added incentive? Two-thirds of B2B buyers in a HubSpot survey say they’ve watched a video to learn about a brand or its products.
Focus on quality
Quality matters to viewers. The HubSpot research found 64% say it’s somewhat or very important. But that doesn’t require expensive equipment.
Modern phones let you shoot video in 4K quality. “You want quality because people equate quality to the quality of your service, quality of your product, and you want that video to last a long time,” she says.
Sarah also recommends you shoot the video at 30 frames per second, especially if the lighting is not perfect.
By producing high-quality videos, you also can more easily repurpose them into multiple formats, from your website to social media.
TIP: Buy a phone just to shoot videos for your business, as 4K video consumes a lot of data storage.
Get the right setup
Though you don’t need to invest in expensive equipment, you should invest in three must-have tools for shooting video from your phone – a tripod, lighting, and a microphone.
Forget the flimsy tripods as they break easily. Instead, buy a tripod with a fluid head. Sarah uses a Pivo tripod, which generally costs less than $100.
Lighting is next on her list. “When you don’t use lighting, your video will look grainy because your cell phone camera lens is working so hard to lighten it up that it will look pixelated,” Sarah explains.
CMI’s LinkedIn Live host Amanda Subler shared with Sarah and the viewers that she uses Mountdog’s softbox lighting kit ($60).
Finally, buy a good microphone. Sarah uses a Rode Mic Mini ($99) for livestreams and podcasts. It can connect through a USB cable to a computer or phone (an adapter is required for the iPhone). She uses a lavalier mic that she clips to her lapel for Instagram Live videos to make sure her audience can hear studio-quality sound.
TIP: Though not necessary, sound-absorbing panels can be a smart investment. They prevent sounds – what you’re recording and external disruptive noises – from reverberating through the office or house.
Make it comfortable for you and your viewers
Some people have a flight-or-fight response when they think about being on camera. “It’s OK. It’s normal. We’ve all been there,” Sarah says.
Picking the fight response – committing to going on camera – is a good choice because a human should be in a brand’s videos to gain viewers’ trust and demonstrate the company’s transparency.
To make the recording more comfortable for the speaker and the viewer, Sarah suggests the on-camera person should:
- Project their voice to elicit viewer confidence.
- Make eye contact with the camera to be viewed as transparent and trustworthy.
- Speak in their typical mannerisms (i.e., body language) as that genuineness brings people into the brand.
To get comfortable with that presentation style, the person should practice on camera and review the recording to identify areas to improve.
TIP: Instagram offers a mock-live setting where you can change the audience setting so no one sees you.
Script the conversation and edit the video
Though tempting, speaking extemporaneously should be avoided. A script allows the brand to ensure the video serves the marketing goal. In many cases, the video should follow a similar format – identify a problem viewers may or may not realize they have, explain the solution, and connect the problem and solution for the viewer (i.e., prospective buyer).
TIP: For short-form videos, keep the script to a minute or less (about 120 words).
When the script is followed and the recording is complete, Sarah recommends an app called InShot to edit videos on your phone. It works well as an introductory-level editing tool. “You don’t need to get fancy” by adding transitions and graphics, she says.
As you gain confidence in your skills, you can add a graphic explaining the video topic and then maybe a transition. “Before you know it, you’re going to be creating videos with transitions and brand graphics,” Sarah says.
But you can’t get there – and you certainly can’t get better-than-average results – if you don’t first appreciate more budget and people and better tools and talent aren’t required. Now, what will you shoot first?
All tools mentioned in the article are identified by the author. If you have a tool to suggest, please feel free to add it in the comments.


